
Contents
Advanced Conversion Parameters
Further Editing of the Flash (.swf) movie
CamStudio SWF Producer converts AVI movies to Flash
(.swf) files. Normally, an AVI
converted to SWF by the producer results in a much smaller file that can be
streamed across the internet.
The SWF Producer is able to convert AVIs to Flash
files in a lossless manner. This means there is no degradation of image quality
or decrease in frame rates. For an AVI with small dimensions running at high
frame rates, the .swf filesize
is about 30% of the original AVI file.
For large image-sized AVIs, the reduction in file size is even more
dramatic, with the converted file being only 5% of the original AVI.
You can even further enhance the .swf produced
by CamStudio by loading it in a container in Flash MX editor. For more details,
please refer to the section on Further Editing of the Flash (.swf) movie below.

The SWF Producer can operates in 3 modes.
2)
Used internally by CamStudio Screen Recorder when
recording directly to Flash.
3)
As a command line program in silence mode (useful for batch
conversions).
The
first mode runs like a normal program. You can launch it by selecting the Tools :: SWF Producer command inside the CamStudio Screen Recorder. Or you can simply double click the
Producer.exe file in the installed directory.
To
convert a file, simply click the ![]() button. The producer will ask you for an AVI file to convert. It will
then display a dialog box below where you can adjust some of the conversion
parameters.
button. The producer will ask you for an AVI file to convert. It will
then display a dialog box below where you can adjust some of the conversion
parameters.

The
Output Filename items let you indicate the name of the (.swf) to
generate. You can choose a different
filename by clicking on the Change button. The producer will also
create an accompanying HTML file that will be opened when the conversion is
completed. You can thus preview the .swf movie in your internet browser.
The
Video Properties items let you specify the color display mode of the
Flash movie. It can be 16bit or 32bit. A 16 bit movie will give a smaller file
size, but may affect the display quality slightly.
When
the SWF Producer converts the AVI, it actually behaves like a player that plays
back the AVI and re-samples / re-captures the frames at fix periods of time.
The Sample rate is the number of frames that is sampled every second.
This rate is also used in the playback of the Flash (.swf) movie. A higher rate
will result in a smoother playback, but a large value is not necessary if the
original AVI itself is not playing at high speed.
The
Producer generates Flash movie frames using a temporal compression algorithm.
To save space, it does not save every frame for each frame it samples or
captures. Instead, the difference between the current frame and the previous
frame is stored. The Producer thus periodically store a full frame (Keyframe)
followed by a number of difference frames (Intermediate Frames). The Keyframe
Rate indicates the number of Intermediate Frames that will follow each
Keyframe. A higher value usually means higher compression.
You
also can Encode the Audio to the Flash movie if there is an audio track
in the AVI. You can encode it without compression (PCM) or with compression
(ADPCM).
Please note
The
audio track in the original AVI may already be compressed in some format that
is incompatible with Flash (e.g CCITT u-law or CCITT A-law ). In this case,
CamStudio Producer will attempt to convert it to PCM and then reconvert to, say
ADPCM, before actually saving the sound stream to the Flash file.
Sometimes, the audio conversion stage indicated
above may fail. You may get error messages such as “Error Opening Audio File
for Conversion”. In this case, you can
solve this by pre-converting the audio track in the AVI file to the PCM format.
This can easily be achieved with a third party video editor (such as
VirtualDub).
Behavior Group
The
Add Player Controls item, when checked, will add a play, stop and pause
button to the Flash movie.
The
Loop item will cause the Flash movie to go back to the 1st
frame when it has finished playing.
Otherwise, it will stop at the last frame.
The
Autostart item will cause the Flash movie to play automatically when
launched. If this item is turned off,
you will need to add player controls to the Flash movie. Otherwise, the Flash
movie will always stop at the 1st frame and there is no provision
(no play button) for users to play it.
If
Loop is selected, but AutoStart is turned off, the Flash movie,
when it has finished playing, will go the 1st frame and stop there.
The
Add Preloader + Progressbar checkbox adds a “Loading … “ message to the SWF file.
A progress bar at the bottom indicates the fraction of loading that is
completed.
If you select the Produce raw
movie checkbox, CamStudio will produce a linear SWF file without the
Preloader and Player buttons. This raw movie can be loaded / enhanced by the
Flash MX editor.
For
more details, please refer to the section on Further Editing of
the Flash (.swf) movie below.

This panel allows you to customize
the message that the preloader displays when the SWF file is being loaded. The
default message is “Loading …”, but you can easily translate the message into a different
language by choosing another bitmap.
Alternatively, using your company’s logo as the preloader image may give
the Flash file a professional touch.
When
the Flash Player has downloaded a SWF file partially, it will start playing the
movie. The Percentage of movie to
preload refers to the fraction of the movie that will be loaded before the
playing starts.
If
you want to make the dimension of the Flash file to be larger than the
dimension of the AVI movie, you can specify a non-zero width and height for
the borders around the movie. The
borders are, by default, white in color. However, if you need to match colors
with your custom controller (i.e custom play buttons etc.), you can change the
border colors by clicking the “Background Color” button.
If you want to customize the graphics
for the controller interface, you can do so by editing the bitmap files in the
<CamStudio Installation Folder>//controller directory. You are advised to
use graphics with the same dimensions as the original bitmaps. Otherwise you
will need to edit the Controller.ini file (in the //controller
subfolder) with a text editor.
Advanced Conversion Parameters
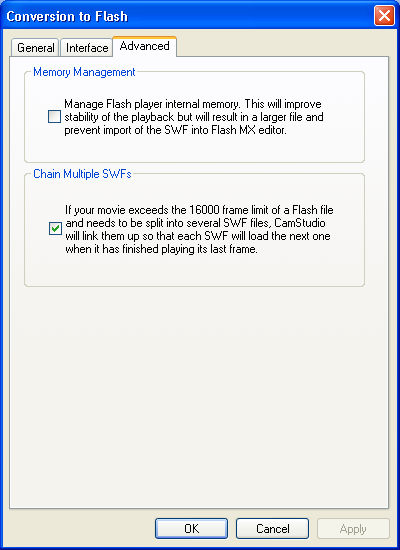
The Manage Flash Player Memory will reduce
unnecessary memory usage. It achieves this by freeing objects / frames that
have already been displayed. However, because of this, movies with the “Loop”
option will need to reload every time they have completed playing.
If
your AVI file is very large, CamStudio will not be able to squeeze all the
information into a SWF file. This is due to the 16000 frame limit imposed by
the Flash player. In this case, CamStudio will split your movie into several
SWF files that are chained together. For deployment, you will need to upload
all the SWF files to your server.
You
have the option not to chain the SWFs together if you are creating an
external SWF file that will load and manage them. This assumes you are very
experienced in using actionscripts in the Flash MX editor and is thus not
covered in this help file.
![]()
2) Used internally by CamStudio Screen Recorder
You
can set the CamStudio Recorder to record directly to Flash. This is toggled by
the ![]() button in the
CamStudio Recorder.
button in the
CamStudio Recorder.
3) Command Line Mode – Silence Mode
The
Producer can also be launched on the command line (in DOS Prompt) by typing
Producer –b filename.avi
When
Producer is launched this way, it opens the file “filename.avi” and
automatically converts the AVI movie into a Flash file and then exits. It will not issue any error messages or
display any HTML preview during conversion. As such, it is useful for
converting multiple copies of AVI into Flash files.
The
output file name will usually be filename.swf, and will be stored in the same
directory as filename.avi. Additionally, a second file, filename.swf.html, will also be generated for testing the SWF file.
For
example, you can create a batch file with the following commands.
producer
-b c:\folder1\demo1.avi
producer
-b c:\folder2\demo2.avi
producer
-b c:\folder3\demo3.avi
By running
the batch file, you will be able to obtain the following output files after
conversion.
c:\folder1\demo1.swf
c:\folder1\demo1.swf.html
c:\folder2\demo2.swf
c:\folder2\demo2.swf.html
c:\folder3\demo3.swf
c:\folder3\demo3.swf.html
For advanced users
of command line mode
You can also place a text file CamStudio.Producer.param in the directory of Producer.exe. When producer is launched with the –b option, it will first
search for this file and attempt to override the default parameters with the values
indicated in this file. An example of this file is found in CamStudio’s
installed directory.
Some parameters are
|
Parameters / Default Values |
Description |
|
Max_HalfKeyDepth = 15 |
key
frame rate (5, 10 ,12, 15, 20) |
|
FrameOffsetX = 0 |
add a
border with the specified thickness to the left and right of the swf movie
(valid values 0 to 200) |
|
FrameOffsetY = 0 |
add a border with the
specified thickness to the top and bottom of the swf movie (valid values 0 to
200) |
|
useAudio = 1 |
encode
audio (0 or 1) |
|
useAudioCompression =
1 |
0 è PCM, 1
è ADPCM |
|
sampleFPS = 40 |
sample
or playback rate (5, 10, 12, 15, 20, 25, 30, 35, 40) |
|
convertBits = 16 |
16 or
32 bit graphics (valid values 16 or
32) |
|
NoLoop = 0 |
1 means no loop, 0 indicates looping |
|
noAutoPlay = 0 |
A value
of 1 means the movie will stop on first frame, 0 means the movie will play on
start |
|
addControls = 0 |
add play, stop and pause buttons to the movie
(value 1 or 0) |
|
controlsHeight = 25 |
height
of the control bar |
|
adpcmBPS = 5 |
if
compressing audio to ADPCM, this value is the number of bits to compress to.
Valid values are 2, 3,4 and 5 (5 è least compression, highest quality) |
|
blocksize_x = 64 |
for a large
movie image, use 128; for small movie, the suggested value is 32 |
|
blocksize_y = 64 |
for a
large movie image, use 128; for small movie, the suggested value is 32 |
|
swfbar_red = 0 |
red
component of the control bar (if addControls = 1) value 0 - 255 |
|
swfbar_green = 0 |
green
component of the control bar (if addControls = 1 ) value 0 – 255 |
|
swfbar_blue = 255 |
blue
component of the control bar (if
addControls = 1) value 0 – 255 |
|
swfbk_red = 255 |
red component
of background (valid only if FrameOffsetX
is greater than 0) value 0 – 255 |
|
swfbk_green = 255 |
green
component of background (valid
only if FrameOffsetX is greater than
0) value 0 – 255 |
|
swfbk_blue = 255 |
blue component
of background (if FrameOffsetX or FrameOffsetY is greater than 0) value 0 –
255 |
|
swf_bits_per_sample = 16 swf_samples_per_seconds
= 22050 swf_num_channels = 2 |
These
parameters are applicable only if your AVI contains an audio track that is non-PCM.
The SWF Producer converts the audio internally to PCM by making use of these
values, before further compressing it or saving it to the Flash file. For
bits per sample (valid values are 8 or 16 ) For
samples per second (valid values are 11025, 22050, 44100 For
channels (valid values are 1 : mono, 2 : stereo) |
|
allowChaining = 1 |
If the
AVI is split into several SWF files because it is too large, each of the SWF
files will automatically load the next SWF when it has completed playing.
(value 0 or 1) |
|
freecharacter = 0 |
If
value is 1, performs garbage collection within the Flash Player. Results in
better utilization of memory. (value
0 or 1) |
|
percentLoadedThreshold =
0.70 |
Fraction
of movie to Preload (range 0.1 to 1.0) |
|
addPreloader = 1 |
Adds a
preloader and progressbar to the Flash file. (value 0 or 1) |
|
produceRaw = 0 |
Produce
a raw SWF file for further editing with the Flash MX editor. Usually, you use
the “loadmovie”
actionscript function to load the raw SWf file. |
|
|
|
Please note: When editing this file you should
not change the order of the parameters in the file or insert/delete any
properties. You should also not put any
additional spaces around the equal sign.
An invalid value can cause the Producer to give unexpected results.
The SWF Producer is most effective for converting
files that are created as tutorials. These AVIs are usually characterized by
1)
having
a limited number of colors (i.e do not have many gradient-filled regions)
2)
not
changing much in between each frames, except for the mouse movements.
3)
being
saved in perfect quality (e.g with MS Video 1 codec, the quality is set to 100)
For AVI files that do not hold the above attributes,
the compression algorithm in the SWF Producer will not work well and may even
cause the SWF file to be much larger than the AVI file.
Further Editing of the Flash
(.swf) movie
(This section assumes you already know how to use Flash MX)
You can actually import the .swf produced by
CamStudio into the Flash MX editor with the File : Import command. However,
this will expand the individual frames and remove the inherent compression in
the original .swf file.
Instead, you can use the loadmovie (Actionscript function) to load the file to control
or enhance it.
To accomplish this, you need to produce two flash
files and upload both of them on the web. The first file is the raw .swf movie
file, produced by CamStudio’s Producer with the following option
·
Produce
raw movie for further editing in Flash MX editor
The second file is a container file that loads the first file using the loadmovie function. This file is created in the Flash MX editor and can be used to control the first file. As an example :
Within the Flash MX editor
|
1) Start a new Flash MX
Project. |
|
2) Create a blank Movie
Clip Symbol by choosing Insert :: New Symbol and selecting the Movie Clip radio button. (Give a name, say
"movie", to the symbol) |
|
3) Instantiate the
Symbol by dragging it to your scene. Choose
Window :: Library and drag the symbol "movie" into your scene. |
|
4) Select the
"movie" instance that you have dragged into your scene, and add the
following actionscripts to it. (Assuming you have already saved a file
"untitled.swf" produced by CamStudio in the folder “c:\\folder1) onClipEvent
(load) { this.loadMovie
("c:\folder1\untitled.swf", ""); } |
|
5) Press Control-Enter
to test the movie. |
|
6) Export the .swf file.
This file is the container for untitled.swf. When
you upload the container .swf , you will of course have to change the local
folder in the actionscript to something like this.loadMovie
("http://www.domain.com/flashmovie/untitled.swf", ""); Or you can simply use “untitled.swf” without any
path, and put the file untiled.swf in the same folder with the container. |
After you have successfully created the container to
load the movie, you can enhance it further by adding a pre-loader or a control bar
with play/stop/pause buttons.